How to install non-slip shower strips in your bathroom for maximum safety
You know it is easy to slip on wet bathroom floors. Every year, many people go to the emergency room after falling in the shower. Older adults have a higher chance of breaking bones and staying in the hospital. Installing non-slip shower strips is a simple way to make your bathroom safer. Shower Strips Non Slip are easy for anyone to install. You will feel safer every time you use your shower.
Key Takeaways
- Pick good non-slip shower strips. They should be made from strong materials like rubber or vinyl. This helps them last longer and gives better grip.
- Clean your shower surface well. Make sure it is dry before you put on the strips. This helps the strips stick better and keeps you safe.
- Measure where you want the strips to go. Mark the spots so the strips cover the area evenly. This helps stop slips.
- Check the strips often to see if they still stick well. Clean them to keep them working and safe.
- Change strips that are worn out or peeling right away. This keeps your bathroom safe for everyone, especially older people and kids.
Choose the best non-slip shower strips

When you look for a non-slip solution for shower safety, you will find many options. Picking the right strips can make your bathroom much safer and help you feel more confident every time you step into the shower.
Types of non-slip shower strips
You can choose from several types of anti-slip solutions. Each type has its own features and benefits. Here are some popular choices:
- Grip-It Anti-Slip Shower Tape – This tape has a strong adhesive and a textured surface. It gives you great traction.
- Slip-X Solutions Anti-Slip Safety Tape – Easy to install and grips well on wet surfaces.
- Safe-T-Proof Anti-Slip Shower Strips – These strips last a long time and work well in busy bathrooms.
- LifeGrip Anti-Slip Safety Tape – Waterproof and stands up to chemicals, perfect for shower use.
- EdenProducts Anti-Slip Shower Tape – Eco-friendly and non-toxic, safe for your family and the environment.
Tip: Non-slip strips often work better than anti-slip mats and strips because they stick right to the floor and do not move around.
How to select shower strips non slip
You want to pick strips that fit your needs and your shower. Here are some things to think about:
- Material Quality: Look for rubber, vinyl, or PVC. These last longer and grip better.
- Suction Cups and Grip: Make sure the strips or mats stay in place on your shower floor.
- Size and Coverage: Measure your shower so you get enough strips to cover the area.
- Water Drainage: Good drainage helps stop mold and mildew from growing.
- Maintenance and Cleaning: Choose strips that are easy to clean and resist mold.
You can buy high-quality anti-slip solutions online or in stores. Here are some places and products to check out:
| Product Name | Price | Link |
|---|---|---|
| No-Slip Strip by 3M - 1" Black | $48.12 | View Product |
| No-Slip Strip by 3M - 2" Black | $160.66 | View Product |
| Moen Decorative Treads, Choose Style | $6.58 | View Product |
| Anti-Slip Tapered 16"x34" Bath Mat, Fine Grade Vinyl | $75.89 | View Product |
You can also find options on Aliexpress.
When you compare anti-slip solutions, you will see that non-slip shower strips are cost-effective and easy to install. They give you good traction and work well for all ages. Some strips meet safety standards like ASTM Method C1028-07 or ANSI B101.3, so you know you are getting a safe product for your bathroom.
Prepare the shower surface
Getting your shower ready is the most important step before you install non-slip strips. If you skip this part, the strips might not stick well, and you could lose the safety you want. You want the surface to be clean, dry, and free of anything that could mess with the adhesive.
Clean and dry the area
Start by cleaning your shower floor. You want to remove all soap scum, shampoo residue, and any dirt. If you leave anything behind, the strips may not stick properly. Here are some cleaning products you can use:
- Biodegradable cleaner (great for removing soap film)
- Mild dish soap mixed with warm water
- White vinegar solution
Stay away from powdered cleaners or anything with silicone. These can leave a residue that makes it hard for the strips to stick. After you scrub the shower, rinse it well with water. Dry the surface completely with a towel. If you rush this step, moisture can get trapped under the strips and cause them to peel off.
Tip: Let the shower air dry for at least 30 minutes after you wipe it down. This helps make sure the surface is totally dry.
Mark placement for strips
Now you need to decide where you want the non-slip strips. Think about the spots where you stand most often in the shower. Use a washable marker or painter’s tape to mark the spots. This helps you line up the strips evenly and keeps them from looking crooked.
- Stand in the shower and check where your feet usually go.
- Mark those areas with small dots or lines.
- Space the marks evenly so you get good coverage.
Taking a few minutes to plan the layout makes the installation easier and helps you get the most safety from your new strips.
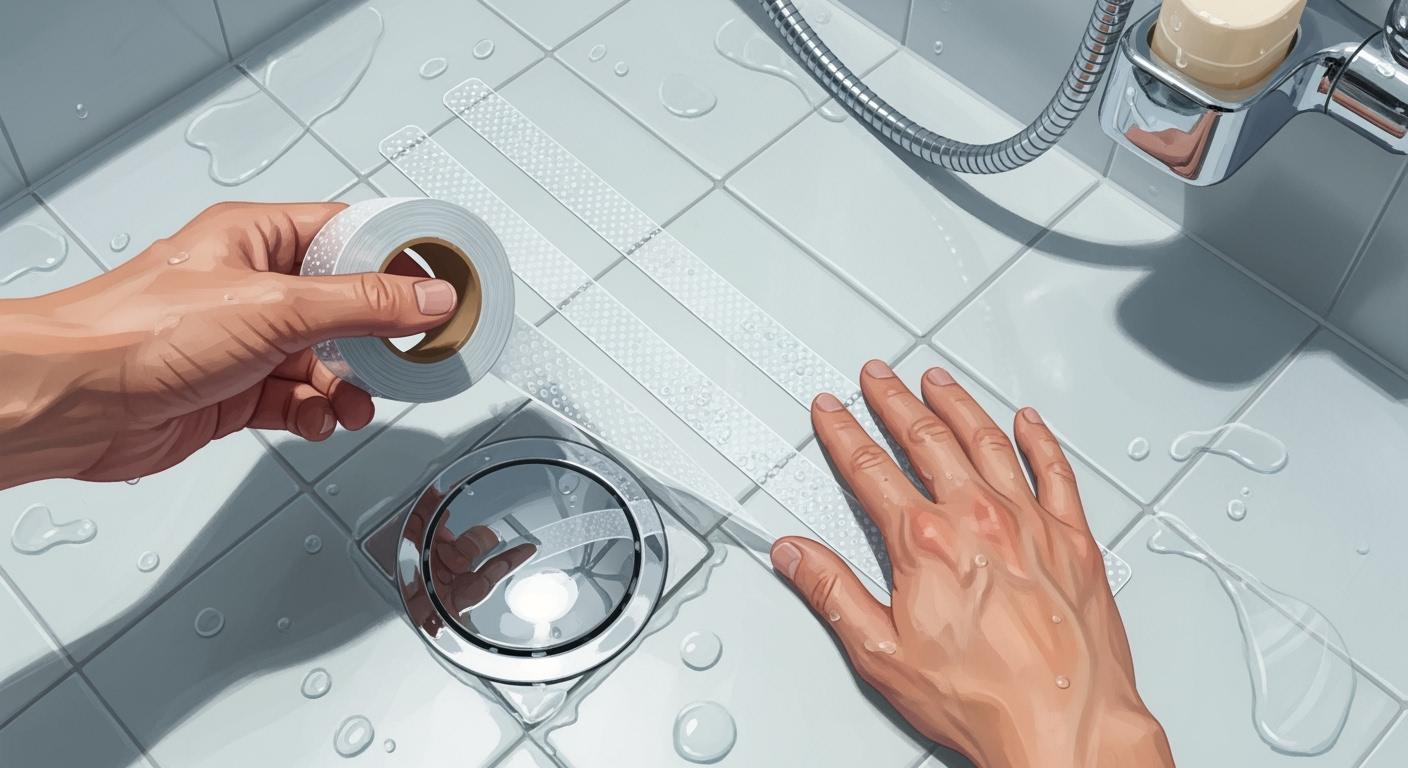
Install shower strips non slip
You have cleaned and marked your shower. Now it is time to install shower strips non slip. This step is where you make your bathroom safer and more comfortable. Let’s walk through each part so you get the best results and enjoy a slip-free shower.
Cut strips to fit
Most anti-slip strips come in rolls or long pieces. You need to cut them to fit your shower. Use sharp scissors or a utility knife. Measure the space between your marks. Cut each strip so it fits neatly in the marked area. If your shower has curves or corners, trim the strips to match the shape. You want the strips to cover the spots where you stand most often.
Tip: Lay out all the pieces before you stick them down. This helps you see if you have enough coverage and if the strips look even.
If you have a large shower or a unique shape, you might need to cut some strips shorter or at an angle. Take your time. The more careful you are now, the better your anti-slip solution will look and work.
Apply and press down strips
Now you are ready to stick the shower strips non slip to your shower floor. Follow these steps for the best grip and long-lasting safety:
- Peel off the backing from one strip at a time.
- Line up the strip with your marks. Start at one end and slowly lower the strip onto the shower floor.
- Press the strip down as you go. Use your palm or a roller to push out any air and make sure the strip sticks well.
- Pay extra attention to the edges. Press them down firmly so water cannot get underneath.
You want to avoid air bubbles under the strips. These can make the anti-slip strips less effective and cause them to peel up over time. If you see a bubble, lift the strip gently and press it down again.
Note: If your shower gets a lot of use or if you have trouble with strips sticking, you can use contact cement adhesive. This glue gives you a stronger, longer-lasting bond. It works well in bathrooms with lots of moisture or soap scum. If the original adhesive on your strips does not hold, contact cement can help keep your anti-slip strips in place.
Remove air bubbles with roller or squeegee
Air bubbles can make your anti-slip strips less safe. You want the strips to stick flat to your shower floor. Here is how you can remove bubbles:
- Start in the center of each strip.
- Use a roller, squeegee, or even a clean towel.
- Press outward from the center to the edges.
- Move slowly and use firm, even pressure.
If you see a stubborn bubble, lift the strip just enough to let the air out. Press it back down and smooth it again. This step helps your shower strips non slip last longer and keeps your shower safe.
Tip: Work with one strip at a time. This makes it easier to control bubbles and get a smooth finish.
Extra tips for a slip-proof shower
You want your anti-slip strips to last. Here are a few more tips for slip proofing showers:
- Make sure the shower is completely dry before you start.
- Do not rush. Take your time with each strip.
- If you want even more grip, try adding non-slip tape in high-traffic spots.
- For families with kids or seniors, install non-slip shower mats as an extra layer of safety.
You can use your shower right after you finish installing the strips. There is no need to wait. The adhesive bonds quickly, so you get instant anti-slip protection. If you used contact cement, check the instructions. Some brands suggest waiting a few hours for the glue to set.
Adding anti-slip strips is one of the best ways to make your bathroom safer. You do not need special tools or skills. Just follow these steps, and you will have a shower that feels secure every day.
Remember: Anti-slip strips work best when you install them on a clean, dry surface and press them down firmly. Check them now and then to make sure they stay in place.
With these steps, you have finished the most important part of making your shower safe. Enjoy your new slip-proof bathroom and the peace of mind that comes with it!
Check and maintain non-slip shower strips
Test adhesion and safety
You want your shower to stay safe every day. After you install non-slip shower strips, you should test their grip and make sure they stick well. Step into your shower and press down on each strip with your foot. If a strip moves or lifts, you need to fix it. You can use a roller or your hand to press the strip down again.
To lower your risk of falls, you can use special tools to check slip resistance. Some common testers include the pendulum dynamic coefficient of friction (DCOF) tester, SlipAlert Tribometer, and BOT-3000E. The pendulum DCOF tester works well in wet places like showers. It uses soft rubber, which matches barefoot situations in the bathroom. When you check the results, look for a safety score like 0.42 or higher. This means your strips help prevent slips and lower your risk.
Tip: Test your strips every month. Regular checks help you catch problems early and keep your bathroom safe.
Clean and replace as needed
Keeping your shower clean helps your non-slip strips last longer. Dirt and soap can build up and lower the grip. You should clean the strips with mild soap and water. Avoid harsh chemicals, which can damage the strips and raise your risk of slipping.
Here’s a simple cleaning routine:
- Wipe the strips with a damp cloth after each shower.
- Use a soft brush for tough spots.
- Rinse well and let the area dry.
If you see a strip peeling or losing grip, replace it right away. Old strips can increase your risk of falls. You can buy new strips and install them in minutes. Keeping your bathroom safe is easy when you check and clean your strips often.
| Maintenance Task | How Often | Why It Matters |
|---|---|---|
| Test adhesion | Monthly | Lowers risk of slips |
| Clean strips | Weekly | Keeps grip strong |
| Replace worn strips | As needed | Maintains safety |
Remember: A clean, well-maintained shower lowers your risk and keeps your bathroom safe for everyone.
You can enhance your bathroom's safety by installing non-slip shower strips the right way. Follow these steps for best results:
- Clean and dry the surface.
- Measure and mark where strips go.
- Apply adhesive and press down.
- Trim extra material.
- Let strips dry.
- Test for grip.
Keep your bathroom safe by cleaning strips often. This stops mold and keeps traction strong, which helps everyone, especially seniors. Take action today and enjoy peace of mind every time you shower!
FAQ
How long do non-slip shower strips last?
Most non-slip shower strips last 6 to 12 months. If you clean them often and check for peeling, they can last longer. Replace them when you see wear or lose grip.
Can I use non-slip shower strips on textured surfaces?
You get the best results on smooth surfaces. Strips may not stick well to textured or uneven shower floors. For textured surfaces, look for special anti-slip tape made for that purpose.
Are non-slip shower strips safe for kids and seniors?
Yes! Non-slip shower strips help prevent slips for everyone, including kids and seniors. You add extra safety to your bathroom with these strips. Always check that the strips stay in place.
How do I remove old non-slip strips?
Peel up one corner and pull slowly. Use warm water or a hair dryer to loosen sticky residue. Clean the area before you install new strips.
Where can I buy high-quality non-slip shower strips?
You can find premium non-slip shower strips online, at hardware stores, or through B2B suppliers. Look for trusted brands and check reviews before you buy.